How to Air-Dry Hair Without Heat or Frizz
In this article:
- Why Your Hair Frizzes Using a Blow Dryer
- Terry Cloth vs. Microfiber vs. Air-Drying Only
- Your No-Heat Hair Drying Routine
- Curl-Specific Routine for Heat-Free Drying
- Five Mistakes to Avoid When Air-Drying Hair
Key Takeaways:
- Replace rough terry cloth with microfiber to minimize friction and prevent roughening the hair cuticle; always gently blot or "plop" your hair instead of rubbing it to help prevent frizzy hair.
- Apply a hydrating or smoothing product to damp hair before it begins to dry to seal the cuticle and create a professional shield against humidity.
- Once your hair is prepped and air-drying, avoid touching, flipping, or scrunching until it is 100% dry to ensure your natural curl pattern sets without frizz.
Why Your Hair Frizzes Using a Blow Dryer
Giving your hair a break from the heat is one of the kindest moves you can make for your hair. Whether you're reaching for a microfiber wrap or letting your hair do its thing in the open air, less heat means less stress, more moisture, and hair that looks and feels healthier over time. But have you ever ditched the dryer only to end up with frizzy hair? There's a reason for that.
When you blow-dry with directed airflow, that targeted heat evaporates water in a flash and encourages the cuticle to lay flat and seal as it sets. Without that directed heat, the cuticle stays open and vulnerable while moisture evaporates on its own schedule.
An open cuticle is a rough cuticle. When those cuticles aren't sealed, they catch on each other and soak up humidity, creating that puffy, frizzy texture. Add friction from the wrong drying method, and you end up with major frizz. Frizz-free air-drying is 100% doable. It's not about skipping the tools—it's about swapping in the right technique and the right professional prep.
Terry Cloth vs. Microfiber vs. Air-Drying Only
Not all drying methods are created equal, and the right choice makes a bigger difference than you'd think. Here's how the three main ways to dry your hair without heat compare:
Terry Cloth Towels: Terry cloth towels might be the bathroom default, but they're the roughest move for your hair. Those thick, looped fibers create major friction against the cuticle and it gets worse when you rub back and forth on autopilot, leaving your hair a frizzy mess before it's even half dry.
- Microfiber Towels: Microfiber changes the game. These ultra-fine, smooth fibers soak up moisture fast without dragging against your delicate strands. Less friction means a flatter cuticle, and a flat cuticle is your #1 defense against frizzy hair. Scrunch or blot gently—never rub.
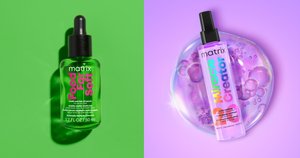
- Air Drying: It's the gentlest method for your strands, but it's a marathon, not a sprint. Without a product shield, your cuticle is wide open to humidity and frizz. For a smooth, controlled finish, always start with a hydrating prep like Miracle Creator Multi-Tasking Treatment or Food For Soft Multi-Use Hair Oil. Our go-to formula for success: microfiber first, air-dry second, and product, every single time.
Your No-Heat Hair Drying Routine
Mastering the perfect air-dry is all about those first five minutes. Once the water's off, follow this sequence for a frizz-free finish.
- Squeeze, Don't Wring: Start your style before you even step out of the shower. Gently press and squeeze sections of your hair from roots to ends to remove excess water. Avoid the urge to wring—twisting your hair open-cuticle creates unnecessary friction.
- Layer Your Frizz-Fighting Heroes: On damp (not dripping) hair, prime with Miracle Creator Multi-Tasking Treatment to detangle and create a humidity-resistant foundation. Next, layer a small amount of Food For Soft Multi-Use Hair Oil through your mid-lengths and ends. Infused with Avocado Oil, this leave-in treatment helps seal in hydration for hair that looks shiny and smooth, with 7x more moisture for up to 72 hours.
- Microfiber Blot and Wrap: Lay your microfiber towel over your hair and gently scrunch upward. Press the towel into your strands, never rub. For longer hair, wrap it into a loose turban for 10-15 minutes. For shorter hair, a quick blot-and-scrunch is all you need.
- Hands Off While It Finishes: Once you unwrap, let your hair air-dry the rest of the way. Every time you scrunch, flip, or finger-comb damp hair, you're disrupting the cuticle and inviting frizz back. Trust the process and let it set.
Curl-Specific Routine for Heat-Free Drying
For our curly and coily community, air-drying isn't just an option—it's the ultimate move. To protect natural definition and bounce without a diffuser, you just need a slightly different Matrix approach.
- Prep for Pattern Perfection: Gently squeeze out excess water, then apply styling products while hair is still soaking wet. Start by smoothing A Curl Can Dream Moisturizing Cream through sections: a leave-in cream infused with Manuka honey extract that provides moisture and definition without flaking or crunch. Follow with A Curl Can Dream Scrunch N' Go Defining Spray for waves and curls, delivering up to 48-hour wave definition without weigh-down.
- The Power of the Scrunch: Once your cream and spray are applied, work hair upward toward your scalp, encouraging your natural curl pattern to take shape. For tighter coils or extra hold, layer in A Curl Can Dream Light Hold Gel, which defines without flaking or crunch.
- Try the Plopping Technique: Lay your microfiber towel flat, flip your hair onto it face-down, and wrap the towel around your head, keeping curls scrunched up. This lets curls set in their natural shape without being stretched out by gravity while wet. Leave for 15-30 minutes, then unwrap and let the air do the rest.
- The Golden Rule: Do not touch. Touching, scrunching, or rearranging damp curls breaks up the "cast" and the curl clumps that give crisp definition. Once hair is 100% dry, use a few drops of A Curl Can Dream Lightweight Oil to gently scrunch and break the cast, separating curls and adding shine for a soft, bouncy result.
Five Mistakes to Avoid When Air-Drying Hair
You've committed to going heat-free, your intentions are good, yet you still encounter frizzy hair. If this is a common occurrence, remember these tips.
- Stop the Terry Cloth Rub: Traditional towels are too rough for your hair's delicate cuticle. Swap to microfiber and blot instead of rub.
- Never Skip Your Damp-Hair Prep: Air-drying without a hydrating or smoothing product leaves your hair's cuticle wide open to humidity. Even a small amount of oil or a leave-in treatment makes a world of difference in blocking out frizz.
- The "Hands Off" Rule: Every flip, scrunch, or tuck disrupts the cuticle while it's trying to set. Patience is the ultimate frizz-fighter.
- The Damp Sleep: Sleeping on wet hair causes friction and flattened curl patterns, plus unnecessary breakage. If you're a night washer, let hair dry fully before bed, or wrap it in a silk or satin scarf.
- One Size Does Not Fit All: Fine, straight hair and thick, coily hair have different needs. Adjust your towel method, product amount, and drying time based on your unique texture.